No message at this time.
Be the first to post a comment.
|
Everybody
that comes to our
office ask if there
is any secret about
cleaning shells.
We have to tell
those people that
unfortunately we
didn't find a secret
liquid that makes
the animal disappear
Although,
you have some options
to have nice and
clean shells:
1.
Follow the tips
we'll give bellow;
2. Exchange or
Buy the shells
already cleaned;
3. Hire someone
to do the dirty
job (we use this
one);
4. Collect stamps
(just kidding!!!!)
First
of all, you must
remember that every
shell must be very
well cleaned, collected
live or dead. It
is a good practice
to wash even dead
collected shells
with bleach. A clean
collection will
last for years,
even centuries.
We've seem shells
very damaged, because
of dust and fungus.
Byne's disease is
one thing no one
can solve yet. We
saw shells affected
by this " white
dust" that
covers some shells,
near a perfect specimen.
It does not spreads
like fungus or anything
else. Some conditions
are known to worsen
this disease as
certain types of
wood (especially
if the wood is not
completely dried
before to make the
cabinet).Another
important point
is the way the animal
is preserved. If
it is fresh, on
alcohol, frozen,
dried or rotten
(the worst condition).
We've learned the
best way to carry
shells when we travel
is alcohol (30%
alcohol 70% water).
Some species are
even easier to clean
later. Freezing
is another good
way to clean, but
sometimes you have
to freeze and defrost
the shell many times
(two or three days
doing that) to loose
the animal.
One important tip: DO NOT USE ANY KIND OF ACID, AS MURIATIC ACID OR ANY OTHER STRONG CHEMICAL PRODUCTS, unless you want to use your shells for decoration, as it can destroy specimen shells. It sounds marvelous that shells magically become nice using acid, but it will ruin the first layers of the shell, and if not properly neutralized it will continue eating it. I have found shells from very old collections which still were smelling acid
LETS
START!
You
will
need:
To
wash:
- Toothbrush;
- A
bigger
brush
as
those
used
for
laundry;
- Some
metal
wiring,
preferable
made
of
stainless
steel,
to
make
different
sizes
of
hooks
to
pull
the
animal;
- Water
hose,
attached
to
a
high-pressure
tap.
It
is
advisable
to
have
at
least
two
different
sizes
of
attachments
to
bigger
and
smaller
water
jets;
- Containers,
in
different
sizes
from
ice
tray
to
a
bucket;
- Mask;
- Goggles;
- Gloves;
- Tweezers;
- Foam
trays
to
put
the
shells
after
you
washed
them;
- Paper
towel;
- A
dry
place
(on
the
shade)
to
let
the
shells
dry
out.
|
|
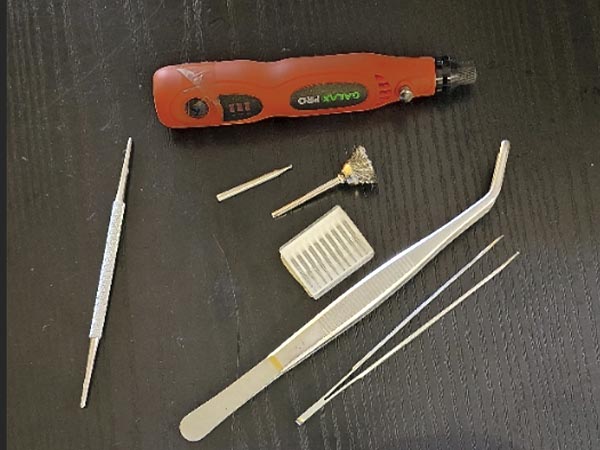
To
clean
the
outside:
- A
power
tool
(as
Dremel or something cheaper as the wireless shown here)
and
different
sizes
of
bits
(dental
bits);
- If you frequently clean shells you might consider buying an ultrasound scaler (we use a veterinarian model, cheaper than the ones used by dentists). This is a game changer, you will be able to clean shells without damaging them ;
- A
tooth
pick;
- White
glue;
- Goggles
for
protection;
- Dust
mask;
- A
piece
of
carpet
to
cover
the
table
(to
protect
the
shell
in
case
you
drop
it);
- Cotton;
- A
lamp
with
magnifier;
- Tweezers;
- Baby
oil,
or
silicon
oil
(some
people
prefer
to
use
this
last
one
for
its
long
lasting
effects).
|
Tips:
1.
Use different concentration
of bleach for different
types of shells:
- Shinny
shells: maximum
of 20 % bleach
for 30 minutes
to one hour;
- Rough
surface shells:
use a more
concentrate
solution up
to 100% bleach
for some minutes
(NOTE: I'm
mentioning
here bleach
used for clothing
not industrial
use or highly
concentrate);
- Shells
with periostracum:
concentrate
solution and
wash every
30 minutes.
It will depend
on the thickness
of the periostracum;
- Bivalves:
the same rules
as above,
but watch
closely to
not damage
the hinges;
- Fragile
shells (E.g.
Pinna, Hydatina,
etc.); Just
let it in
the mild solution
for two or
three minutes;
2.
Never boil shells.
It will crack most
of them even if
they are not shinny.
Some people use
to let the water
almost boil and
take the shells
out of the water.
If proved to be
more efficient and
did not damage the
shell. Microwave
can be used too,
but do some tests
with some shell
you don't mind to
loose. It is used
by our friends in
Hawaii to clean
Terebra maculata
- only with fresh
animal (Never, ever,
put a stinky shell
inside your microwave
unless you intend
to dispose the microwave
later)
3. Periostracum
and operculum can
disappear on bleach:
if you want to keep
them intact don't
let them immersed
for a long period.
Although, it is
good to wash them
in bleach for a
few minutes to kill
any bacteria;
4.
Landsnails' periostracum
does not resist
in bleach sometimes
even for one or
two minutes. In
this case is better
to use a toothbrush
and soap;
5. Always
brush on running
water very carefully
all the shells after
you take them from
the bleach solution.
If you can still
smell bleach, wash
it over again.
6.
Wear a mask when
cleaning animals
if you don't feel
comfortable with
the possibility
of having it on
your mouth
7.
The same for goggles;
8.
Wear old clothes;
as careful you seem
to be, bleach will
always find its
way to your brand
new shirt!
9.
Start the job as
neat as possible
to avoid injuries,
damage to the shell,
clothes and work
place;
10. I use
a suspended tray
with a fine mesh
on it on the top
of the sink to hold
the dirt, protect
the shell and avoid
that pieces of the
animal go to the
drain;
11. Try to
clean as many as
possible the same
kind of shell: rough
or shinny surface;
with or without
periostracum; with
or without operculum;
bivalves or gastropods;
marine or non-marine,
etc.
12. Try to use
a sink with a light
bulb placed direct
above it (the useful
way to see the rest
of animal inside
some shells);
13.
Some shells are
cleaned just using
a strong flush of
water (you may try
it before to use
the hook)
14. To
loose the first
whorls, shake hard
hitting the shell
on a thick piece
of foam or cloth.
Be careful with
your hands!
15. Try
to reach the muscle
on the columella
with the hook and
try to loose it
from the shell.
16.
If you notice that
the animal is too
hard, you will probably
have to do one of
these options:
- Let
it stay on
alcohol (30%)
for some weeks;
- Let
it rotten
for one or
two days;
- Freeze
it again and
try after
some days
using the
freeze and
defrost system
(be careful
since some
shells can
break using
this system);
- Prepare
a bucket with
a detergent
solution and
leave the
shell there
for 24 hours.
Try to wash
it again,
and if not
successful,
let it on
the solution
for another
day. Change
the solution
every 48 hours.
Never let
a shell to
rotten in
water only.
And use lots
of water for
a small amount
of shells.
It will avoid
the possibility
of damaging
the shell
by the acids
produced by
the animal.
17.
If you succeed put
the shell on bleach
reserving the operculum.
Is always good to
keep the original
operculum with its
shell.
18. Try to
get a container
with a flat area
on the border so
you can put the
operculum there.
Or if the shells
are small enough
you can put them
on the ice tray
(remember to fill
it before to put
the shells);
19.
Wash of the bleach
and let the shell
dry. We have in
our lab a dehumidifier
that stays on all
the time. But you
can make your own
using a box with
a bulb inside (use
a low wattage bulb
to avoid fire hazard),
and a top made of
aluminum, so you
can place the shells
on it to dry faster.
20.
After the shell
is dried, start
the cleaning processes
for outside:
21.
Use the Dremel
tool choosing an
adequate bit, a
big and sharp one
for thick dirt,
or a small one for
details. Sometimes
a very thick coral
can be detached
using small strokes
with a hammer -
it loses the coral.
22.
If you notice green
spots (algae) under
the dirt, you will
have to bleach the
shell again.
23.
Do not glue the
operculum right
away, wait a few
days to see if there
is no animal left
on the shell. If
you feel anything
try to wash again.
24.
If the shell is
smell-free, fill
it with cotton and
glue its operculum.
Light operculum
does not need lots
of cotton and glue
(e.g. Conus), heavy
operculum you have
to stuff the cotton
very well onto the
shell and use more
glue, otherwise
the operculum will
stay loose and fall
from the shell.
25.
After you wash Bivalves,
you must let them
dry with the valves
closed. Use rubber
band (avoid the
colored ones); If
you let the bivalve
dry do not attempt
to close it, leave
it for a few hours
on water and try
again later.
26.
If the valves are
already split apart,
then glue them just
placing a drop of
glue on the hinge;
27.
To finish the service,
use the baby oil
(or silicon) on
the surface of the
shell using a painting
brush with soft
bristles.
28. Some
land shells have
a nice periostracum
that will disappear
with oil, so leave
it without oil.
29.
On shells with thick
periostracum you
may use a mixture
of 50% alcohol 50%
glycerin, it will
keep the periostracum
soft (apply it with
the shell wet, do
not let it dry first);
30.
As the last resource
to take out the
smell, give it to
a friend, oops,
We mean try to put
some formaldehyde
inside and let it
stay there for one
or two months. Do
not immerse it on
the solution, just
fill the shell with
it. After years
cleaning shells,
We have tried every
way to do my best.
Of course we're
open to suggestions
and we still have
bad time trying
to clean some shells.
So, do not get mad
at the shell if
you can't clean
it properly: remember,
they were made in
this shape for protection!
Enjoy
your cleaning!
|